
Transform Your Car Quickly With Dent Puller Repair Magic
Share
Understanding Dent Pullers: The Game-Changer for Car Owners
Car dents can be frustrating, especially when they suddenly appear on your prized vehicle. Whether from shopping cart collisions, minor fender benders, or unexpected hailstorms, dents diminish your car's aesthetic appeal and potentially its resale value. Fortunately, modern dent pullers offer an accessible solution for many vehicle owners who aren't ready to commit to expensive professional repairs.
Dent pullers represent a category of specialized tools designed to restore your vehicle's surface to its original contour without necessitating costly body shop visits. These implements utilize various mechanisms—suction, glue, or leverage—to gradually coax the metal back into position. The beauty of these devices lies in their simplicity; most don't require advanced technical knowledge to operate effectively.
The automotive aftermarket has witnessed a surge in dent puller innovations over recent years, with manufacturers developing increasingly sophisticated yet user-friendly options. From traditional plunger-style devices to advanced pneumatic systems, the selection available to today's consumer spans a broad spectrum of complexity and capability.
The Evolution of DIY Dent Repair
The journey of do-it-yourself dent repair has been remarkable. Decades ago, removing dents was exclusively the province of professional body shops with specialized equipment and years of expertise. The landscape began to shift in the 1980s with the introduction of the first consumer-grade dent removal tools, albeit with limited effectiveness.
Today's market offers increasingly sophisticated dent pullers that deliver professional-quality results. This democratization of dent repair technology has empowered vehicle owners to address minor to moderate damage without the traditional expense. Modern dent pullers incorporate ergonomic designs, premium materials, and innovative pulling mechanisms that make the process both efficient and accessible to novices.
The pandemic-era surge in DIY projects further accelerated this trend, with many car enthusiasts discovering the satisfaction of restoring their vehicles' appearance through their own efforts. This shift represents not just a practical response to economic considerations but also reflects a broader cultural movement toward self-sufficiency in vehicle maintenance.
Types of Dent Pullers: Finding Your Perfect Match
The dent puller marketplace offers diverse options catering to different dent types, vehicle surfaces, and user expertise levels. Understanding the distinctions between these varieties is crucial for selecting the appropriate tool for your specific situation. Each type possesses unique advantages and limitations that make it suitable for particular dent scenarios.
When evaluating dent pullers, consider factors such as the dent's size, location, and the material composition of the affected panel. Some tools excel at removing shallow dents from flat surfaces, while others are designed to address more complex damage on contoured areas. Your selection should align with both your repair needs and personal comfort level with DIY automotive work.
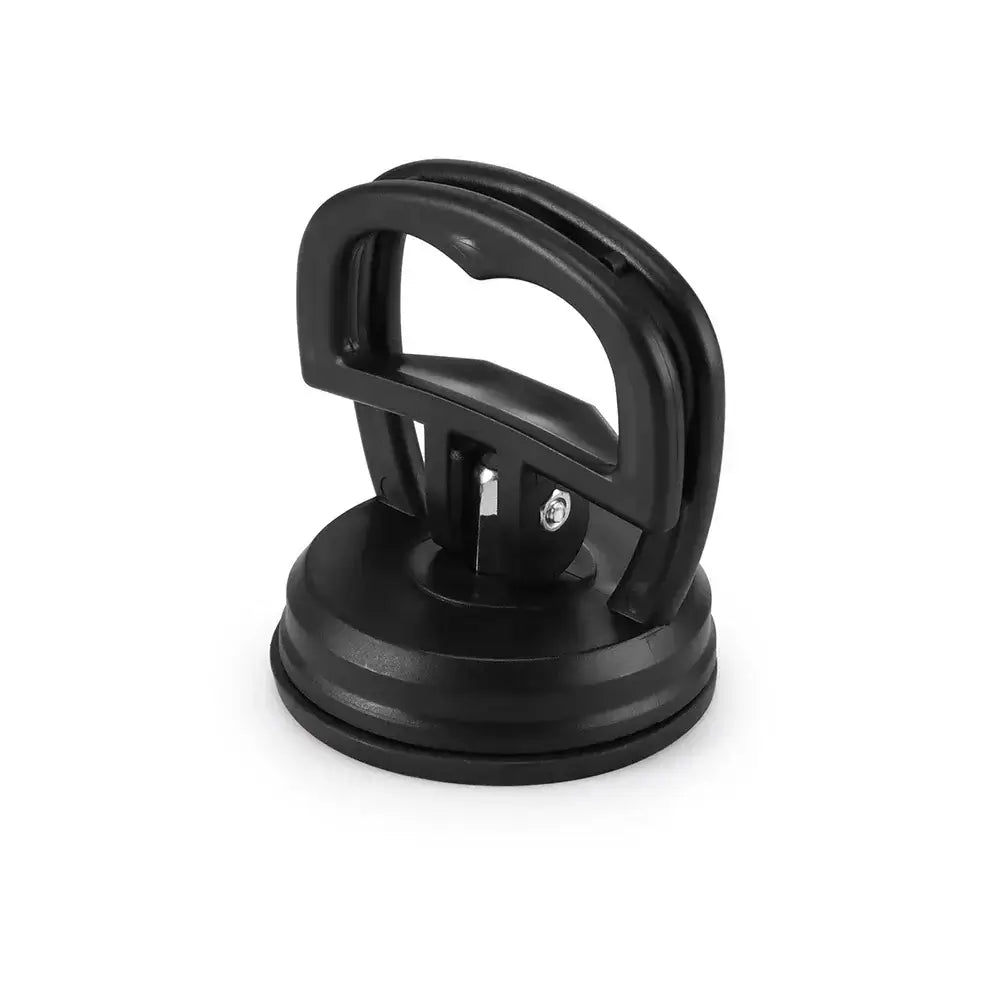
Suction Dent Pullers: The Entry-Level Solution
Suction dent pullers represent the most accessible entry point into DIY dent repair. These devices operate on a straightforward principle: creating vacuum pressure against the dented surface to pull it outward. Typically featuring a rubber cup attached to a handle mechanism, they require minimal setup and technical knowledge.
These tools perform admirably on shallow, uncreased dents on relatively flat surfaces. Their non-invasive nature makes them particularly appealing for beginners concerned about potentially damaging their vehicle's finish. Suction pullers leave no residue and require no additional materials beyond the tool itself.
However, suction pullers do have limitations. They generally lack sufficient pulling power for deeper dents or those with creases. Their effectiveness diminishes substantially on highly curved surfaces where maintaining proper suction becomes challenging. For best results, suction pullers should be applied to clean, smooth surfaces at moderate temperatures—extreme heat or cold can impact the rubber's pliability and suction capability.
Glue-Based Dent Pullers: Precision With Patience
Glue-based dent pulling systems offer enhanced precision for addressing more stubborn dents. These kits typically include specialized adhesive tabs that attach directly to the dented area, connected to a pulling mechanism that gradually draws the surface outward. This method allows for targeted force application precisely where needed.
The methodology involves cleaning the dented area thoroughly, applying the special adhesive to a plastic tab, attaching it to the center of the dent, and connecting the tab to a pulling device. This approach works exceptionally well for smaller, concentrated dents that resist suction-based removal.
The primary drawback involves the time investment required for proper preparation and the cleanup process. The adhesive must be removed carefully to avoid damaging the paint surface. Most kits include a release agent that dissolves the bond without harming the finish. This technique demands patience but rewards users with impressive results on otherwise challenging dents.
"The correct dent puller can transform frustrating damage into a satisfying DIY victory, saving hundreds in repair costs while maintaining your vehicle's value and appearance." - Automotive Restoration Institute
Slide Hammer Dent Pullers: For Automotive Enthusiasts
Slide hammer dent pullers represent a more advanced approach to dent removal, typically embraced by automotive enthusiasts with some mechanical experience. These tools feature a metal shaft with a sliding weight and specialized attachments that connect to the dented area through various means—sometimes requiring small holes to be drilled for maximum effectiveness.
The operational principle involves creating a solid connection to the dent, then using the slide hammer's kinetic energy to pull the metal outward in controlled bursts. This method delivers substantial pulling power capable of addressing more significant damage than suction or glue-based alternatives.
Given their more invasive nature, slide hammers demand careful consideration before implementation. They often necessitate touch-up work afterward, particularly when using attachment methods that require penetrating the panel surface. These tools prove most appropriate for more severe dents on panels where cosmetic perfection isn't the primary concern, or where additional finishing work is already anticipated.
Preparing for DIY Dent Pulling: Setting Yourself Up for Success
Successful dent removal begins long before you apply the puller to your vehicle's surface. Proper preparation not only enhances your chances of achieving a satisfactory outcome but also minimizes the risk of inadvertently causing additional damage. This preparatory phase encompasses environmental considerations, surface preparation, and gathering the appropriate supplementary materials.
Creating optimal conditions for dent pulling can significantly impact your results. Temperature plays a particularly crucial role—metal expands slightly in warmer conditions, potentially making it more responsive to manipulation. Many professionals recommend performing dent removal when the vehicle surface is warm but not hot, ideally between 70-85°F (21-29°C).
Essential Tools and Materials
Beyond the dent puller itself, several auxiliary items can enhance your repair process. Assembling these materials before beginning ensures a smoother workflow and helps address unexpected challenges that may arise during the procedure.
- Microfiber cloths for cleaning and drying the surface
- Automotive detergent specifically formulated for paint surfaces
- Isopropyl alcohol for final surface preparation
- Adequate lighting (preferably adjustable) to reveal subtle contours
- Paint-safe marking pen for identifying dent centers
- Spray bottle with water for monitoring progress
- Heat gun or hairdryer (for moderate warming of metal in cooler conditions)
- Protective gloves to prevent oils from your hands contaminating surfaces
Having these items readily available allows you to maintain momentum throughout the repair process and address various contingencies that might otherwise interrupt your progress. Proper illumination deserves special emphasis—angled lighting reveals subtle surface irregularities that might otherwise remain undetected until after you've considered the job complete.
Surface Preparation Techniques
Thorough surface preparation constitutes perhaps the most underappreciated aspect of successful dent removal. A properly cleaned and prepared surface dramatically improves tool adhesion and provides clearer visibility of the damage you're addressing. This preparatory phase should never be rushed or overlooked.
Begin with a general cleaning using automotive detergent diluted according to manufacturer instructions. After rinsing thoroughly, dry the area completely with microfiber cloths to prevent water spotting. Next, apply isopropyl alcohol to remove any remaining detergent residue, oils, or contaminants that might interfere with dent puller performance—particularly important with suction or adhesive-based systems.
For optimal visibility, some professionals recommend applying a temporary grid pattern with a paint-safe marker around the dented area. This reference system helps track progress and identify high and low spots that might otherwise be difficult to perceive. These markings should be easily removable with alcohol after completing the repair.
Step-by-Step Dent Pulling Techniques: From Amateur to Expert
Mastering dent removal requires understanding not just the tools but also the methodologies that yield optimal results. While different dent types and locations necessitate varying approaches, certain fundamental techniques apply universally. This systematic process transforms what might seem like an intimidating task into a manageable sequence of steps.
The cardinal principle in dent pulling is patience—rushing the process almost invariably leads to suboptimal results. Professional technicians develop their skills through extensive practice, learning to "read" how metal responds to different applications of pressure and adjust their technique accordingly. As a DIY practitioner, embracing this methodical approach will significantly enhance your outcomes.
Working from the Outside In
When addressing dents with any puller type, experts recommend starting at the dent's perimeter and working gradually toward its center. This approach prevents creating new stress points in the metal and promotes more natural reformation of the surface. Think of it as gently persuading the metal back to its original position rather than forcing it.
Begin by applying your chosen dent puller to the outermost edge of the affected area, using gentle, controlled pulling motions. After each pull, reassess the dent's appearance, paying particular attention to how light reflects off the surface. This reflection pattern reveals subtle contours that might not be immediately apparent through direct observation.
As you work inward, gradually adjust your pulling pressure according to how the metal responds. Some sections may require repeated gentle pulls, while others might move more readily. This methodical progression prevents overcorrection—a common pitfall where the former dent becomes an outward bulge, often more difficult to address than the original damage.
| Dent Type | Recommended Puller | Success Probability | Special Considerations |
|---|---|---|---|
| Shallow, round (1-3 inches) | Suction puller | High | Works best on flat panels |
| Creased dent (under 4 inches) | Glue-based puller | Moderate | Multiple pulling points recommended |
| Large dent (4+ inches) | Slide hammer system | Moderate to Low | May require finishing work afterward |
| Hail damage (multiple small dents) | Glue-based puller | High for individual dents | Time-intensive for multiple dents |
The Tapping Technique
For particularly stubborn dents or areas where traditional pulling hasn't achieved perfect results, the tapping technique offers a valuable supplementary approach. This method involves using a rubber mallet or specialized dent hammer with a rubber head to gently tap around the dent's perimeter, working inward with controlled precision.
The tapping methodology works by releasing tension in the metal and allowing it to revert to its original form. Apply light, consistent taps around the dent's circumference, gradually spiraling inward. The force should be minimal—your goal is to vibrate the metal slightly rather than forcefully reshape it. Between tapping sequences, reassess the surface to track your progress.
This technique proves particularly effective for "finishing" a repair after the main dent pulling has been completed. It addresses minor imperfections and high spots that might remain after the primary correction. When performed correctly, tapping can elevate a good repair to an excellent one, approaching professional-quality results.
Finishing Touches: Perfecting Your Dent Repair
After successfully pulling the dent, several finishing procedures can elevate your results from merely acceptable to truly impressive. These final steps address minor imperfections and restore the surface's original appearance, completing the transformation begun with the dent puller.
The finishing phase represents an opportunity to assess your work critically and address any remaining irregularities. Viewing the repaired area from multiple angles and under varied lighting conditions reveals subtle imperfections that might otherwise go unnoticed. Professional detailers often use specialized lighting that accentuates surface variations to ensure comprehensive correction.
Polishing and Paint Correction
Even successful dent pulling can leave microscopic scratches or swirl marks on the paint surface, particularly when using adhesive-based systems. Addressing these imperfections through proper polishing techniques restores the panel's lustrous appearance and ensures the repair remains undetectable to casual observation.
Begin with a high-quality automotive polish appropriate for your vehicle's paint type. Apply using a foam applicator or microfiber cloth, working in small circular motions across the repaired area. For optimal results, many professionals recommend machine polishing with a dual-action polisher on a low-speed setting, which provides consistent pressure and movement.
If more significant paint correction is necessary, progress through increasingly fine polishing compounds. Start with a medium-cut polish to address more noticeable imperfections, then transition to finer formulations that enhance gloss and clarity. Conclude with a paint sealant or wax to protect the freshly polished surface and enhance its visual depth.
When to Seek Professional Assistance
While DIY dent pullers offer impressive capabilities, recognizing their limitations—and by extension, when professional intervention becomes necessary—represents an essential aspect of responsible vehicle care. Certain dent characteristics signal challenges beyond typical consumer-grade tools and techniques.
Consider professional assistance for dents exhibiting these characteristics:
- Creases that extend across body lines or panel edges
- Damage located on double-walled sections or reinforced structural areas
- Dents where paint has cracked, chipped, or separated from the metal
- Areas with complex curves or limited access for DIY tools
- Damage on aluminum panels, which respond differently than steel
- Dents exceeding approximately 4-5 inches in diameter
Professional paintless dent repair (PDR) technicians possess specialized tools and extensive training that enable them to address these more challenging scenarios. Their expertise often proves cost-effective compared to potential damage from unsuccessful DIY attempts on complex repairs. Many offer free evaluations to determine whether a particular dent falls within DIY-repairable parameters.
Maintaining Your Vehicle's Appearance: Prevention and Protection
While dent pullers provide effective remediation, preventing damage initially represents the optimal strategy for maintaining your vehicle's pristine appearance. Implementing proactive measures significantly reduces the likelihood of requiring dent repair in the first place.
Preventative approaches encompass both behavioral adjustments and physical protection systems. The former involves mindful parking habits and situational awareness, while the latter includes products specifically designed to shield your vehicle from common damage sources. Together, these strategies form a comprehensive defense against the everyday hazards that threaten your car's exterior.
Protective Products Worth Considering
The automotive aftermarket offers numerous protective solutions designed to minimize dent risk. These products range from simple parking aids to sophisticated coating systems that enhance your vehicle's resilience against minor impacts.
Door
Door edge guards provide targeted protection for one of the most vulnerable areas—the edges of your vehicle's doors. These thin, flexible strips adhere to door edges, creating a protective barrier against accidental contact with walls, posts, or adjacent vehicles. Available in transparent or color-matched options, they offer practical protection without compromising aesthetics.
Clear paint protection film represents a more comprehensive defensive measure. This virtually invisible urethane film, professionally applied to impact-prone areas, absorbs minor collisions that might otherwise result in denting. Modern films incorporate self-healing properties that eliminate minor scratches when exposed to heat, maintaining clarity over years of service.
For those parking in hail-prone regions, specialized car covers with padded construction offer substantial protection against one of nature's most common causes of multiple dents. These covers feature foam or air-pocket layers that absorb impact energy before it reaches your vehicle's sheet metal. While representing a significant investment, they often cost less than a single hail damage insurance claim deductible.
Smart Parking Strategies
Beyond physical products, intelligent parking decisions significantly reduce dent probability. Implementing these strategies requires minimal effort yet yields substantial protective benefits for your vehicle's appearance and value retention.
Select parking spaces at the periphery of lots, where vehicle density decreases dramatically. This reduced proximity to other cars minimizes the likelihood of door dings—one of the most common dent sources. The extra walking distance represents a small inconvenience compared to the potential time and expense of dent repair.
When parallel parking, look for spaces bordered by driveways or no-parking zones rather than other vehicles. Similarly, in parking lots, spaces adjacent to end caps, islands, or wide walking paths provide buffer zones on at least one side. Angle-parking scenarios present different considerations; wherever possible, select spaces where the driver's side neighbors an empty space or non-vehicular boundary.
Parking orientation relative to shopping cart corrals deserves special consideration. The conventional wisdom suggests parking far from these areas, but an alternative strategy involves parking directly adjacent to them. This approach ensures that at least one side of your vehicle remains protected, as carts are returned to the corral rather than abandoned near your car.
Advanced DIY Dent Repair Techniques for Enthusiasts
For automotive enthusiasts willing to invest additional time and resources, several advanced techniques extend beyond basic dent puller applications. These methods, while requiring greater skill and specialized tools, can address more challenging damage scenarios and often achieve results indistinguishable from professional repairs.
These approaches typically combine multiple techniques in sequence, with each addressing specific aspects of the repair process. The integration of heating, cooling, and specialized manipulation tools allows for precise control over how the metal responds. While demanding greater expertise, these advanced methods significantly expand the range of dents addressable through DIY efforts.
Leveraging Temperature Differentials
Professional dent technicians frequently utilize controlled temperature changes to enhance metal malleability and accelerate repair processes. This technique, adaptable for home use with proper precautions, exploits metal's tendency to expand when heated and contract when cooled.
For implementing this technique, begin by moderately warming the dented area using a hairdryer on high setting or a heat gun on low setting. Maintain the heat source approximately 6-8 inches from the surface, moving constantly to prevent overheating any specific spot. The goal is to warm the metal to approximately 100-120°F (38-49°C)—warm to the touch but not hot enough to damage paint or surrounding components.
Once warmed, immediately apply your dent puller according to standard techniques. The heating process increases the metal's pliability, allowing it to reform more readily with less pulling force. For particularly stubborn dents, some enthusiasts alternate between heating and rapid cooling using compressed air cans turned upside down (which releases cold liquid) or specialized cooling sprays. This thermal cycling can help "shock" the metal back into its original position.
Metal Shrinking Techniques
After successfully pulling a dent, you might occasionally notice slight overextension—areas where the metal now protrudes beyond the original contour. This common occurrence results from the metal stretching during both the initial impact and the correction process. Advanced DIY repairers address this through metal shrinking techniques adapted from professional bodywork practices.
The most accessible approach involves the strategic application of concentrated heat followed by rapid cooling. Using a heat gun (maintaining careful distance to prevent paint damage), warm a small section of the overextended area until moderately hot. Immediately after heating, press the area with a wooden dowel wrapped in cotton cloth soaked in cold water. This rapid temperature change causes the metal to contract slightly, reducing the protrusion.
Work in small sections approximately one inch in diameter, allowing complete cooling between applications. After each heating/cooling cycle, assess the surface contour using raking light to reveal subtle variations. This process requires patience and precision but can transform a good repair into an excellent one by addressing issues beyond the capabilities of dent pullers alone.
FAQs About Dent Pullers and DIY Repairs
As dent pullers gain popularity, numerous questions arise regarding their capabilities, limitations, and proper application. The following responses address the most common inquiries, providing clarity for those considering DIY dent repair.
Can dent pullers damage my car's paint?
Dent pullers, when used correctly, present minimal risk to your vehicle's paint. However, improper application—particularly with adhesive-based systems or excessive force—can potentially compromise the finish. Suction-based pullers generally pose the lowest risk, while slide hammer systems that require attachment points may necessitate touch-up work afterward.
To minimize risk, always ensure thorough cleaning of the surface before application, follow manufacturer instructions precisely, and apply force gradually rather than in sudden jerks. If using adhesive systems, select products specifically formulated for automotive use and follow removal procedures carefully. When in doubt about a particular dent's suitability for DIY repair, consulting a professional can prevent costly damage.
How effective are dent pullers on modern vehicles?
Modern vehicle construction presents both advantages and challenges for DIY dent repair. Contemporary automotive designs typically utilize thinner metal panels than older vehicles, making them more responsive to dent pulling techniques. However, this thinness also increases the risk of overcorrection if excessive force is applied.
High-strength steel and aluminum panels, increasingly common in newer vehicles, respond differently to dent pullers than traditional mild steel. Aluminum, in particular, lacks the "memory" properties of steel, making it less likely to return to its original shape without skilled manipulation. Additionally, modern vehicles often incorporate complex curves and character lines that can complicate the repair process.
For best results on contemporary vehicles, select dent pullers specifically rated for modern automotive surfaces and exercise additional caution regarding applied pressure. Glue-based systems often prove most effective on newer vehicles as they allow precise control over pulling location and force.
What size dents can realistically be fixed with consumer-grade pullers?
Consumer-grade dent pullers typically perform optimally on dents between one and four inches in diameter with minimal creasing. Shallow dents in this size range, particularly those on flat or gently curved surfaces, respond well to properly applied pulling techniques. Success rates diminish significantly as dent size increases beyond four inches or when sharp creases are present.
Depth represents another crucial factor—dents exceeding approximately half an inch in depth present greater challenges for DIY repair. Multiple shallow dents, such as those caused by hailstones, often respond well to patient application of glue-based pullers despite their quantity. The metal's stretch factor—how much it has deformed during impact—also influences repairability; severely stretched metal may never fully return to its original contour without professional intervention.
How long does DIY dent repair typically take?
The time investment for DIY dent repair varies considerably based on dent characteristics, the tool employed, and your experience level. For beginners addressing their first minor dent with a suction puller, allocating 1-2 hours provides a realistic timeframe, including preparation and finishing work.
More complex repairs using adhesive systems might require 2-4 hours, particularly when addressing multiple pulling points or working through several cycles of pulling and assessment. Experienced DIY repairers can often complete similar repairs in half the time through efficiency gained from previous projects.
Rather than rushing to complete the repair in a single session, consider a phased approach for optimal results. After initial pulling, allow the metal to "rest" for several hours or overnight before assessing whether additional correction is necessary. This patient methodology often yields superior outcomes compared to aggressive, time-constrained approaches.
Conclusion: Empowering Your Vehicle Care Journey
Dent pullers represent a remarkable democratization of automotive care, placing previously specialized repair capabilities into the hands of everyday vehicle owners. When approached with realistic expectations, proper technique, and patience, these tools enable impressive transformations that maintain your vehicle's appearance and value without the expense of professional services.
The satisfaction derived from successfully restoring your car's surface extends beyond mere financial savings. There's genuine pride in developing a new skill and applying it effectively to preserve something you value. Each successful repair builds confidence for addressing future challenges, gradually expanding your automotive self-sufficiency.
Remember that dent pulling represents one component in a broader strategy of vehicle care and protection. Combining these reactive repair skills with proactive protection measures creates a comprehensive approach to maintaining your car's aesthetic appeal throughout its service life. Whether you're addressing your first minor door ding or tackling more ambitious restoration projects, the journey toward mastering dent repair offers both practical benefits and personal satisfaction.